
CIDY
[Linux Kernel] Kernel Debugging Environment setup 본문
wsl에서 QEMU를 구동하다가 가상 모니터 활성화를 위해 실행 스크립트에서 display를 none에서 sdl이나 gtk로 해줬는데 뭔가 문제가 터지고 해결이 안 돼서 이것저것 알아보던 중 그냥 가상머신에서 실행시키는게 가장 낫겠다는 판단을 했다.
특히 wsl2면 뭐가 더 복잡하고 어쩌구 해서 바로 가상머신으로 틀었다.
1. VMware에 Ubuntu 22.04설치
https://releases.ubuntu.com/22.04/
Ubuntu 22.04.2 LTS (Jammy Jellyfish)
Select an image Ubuntu is distributed on three types of images described below. Desktop image The desktop image allows you to try Ubuntu without changing your computer at all, and at your option to install it permanently later. This type of image is what m
releases.ubuntu.com
여기서 가상머신 이미지 다운받을 수 있다. vmware에서 Ubuntu 22.04를 만들어주자.

나머지는 알아서 설정해주면 되는데 이미지 오른쪽에 보이는 Virtualization engine박스에 첫 번째 박스를 체크해줘야 KVM을 사용할 수 있다.

이게 wsl이랑 동시에 못 써서 Hyper V설정하고 매번 껐다 켜줘야 하는 단점이 있지만 kvm과 qemu는 상호 보완적인 관계에 있기 때문에 같이 사용해주는 것이 좋다.
2. QEMU 설치 + 빌드
cd ~
# dependency 설치
sudo apt update
sudo apt install bison cloud-image-utils cloud-init flex gcc gcc-multilib guestfs-tools gdb git libssl-dev libglib2.0-dev libffi-dev build-essential libc6-i386 libc6-dbg libglib2.0-dev libfdt-dev libpixman-1-dev zlib1g-dev make net-tools ninja-build pip pkg-config ruby-full tmux vim -y
sudo apt install linux-headers-`uname -r`

# QEMU 설치
git clone https://gitlab.com/qemu-project/qemu.git
cd qemu
git submodule init
git submodule update --recursive
./configure
make

# 경로 설정
echo "PATH=$PATH:~/qemu/build" >> ~/.bashrc
source ~/.bashrc
3. 커널 이미지 다운로드 + 설정
https://cloud-images.ubuntu.com/
Ubuntu Cloud Images - the official Ubuntu images for public clouds, Openstack, KVM and LXD
Google Cloud Platform lets you build and host applications and websites, store data, and analyze data on Google’s scalable infrastructure.
cloud-images.ubuntu.com
여기서 커널 이미지를 버전별로 다운받을 수 있다.
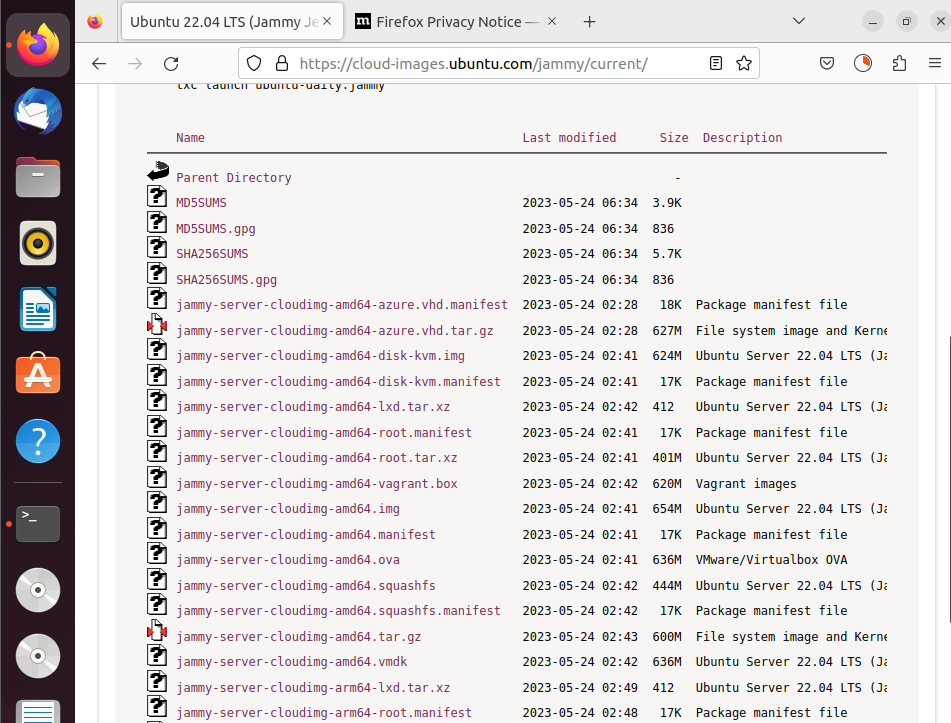
여기서 보이는 .img파일을 다운받아주자.
cd ~
mkdir kernel
cd kernel
mkdir ubuntu-5.15.0-76-generic
cd ubuntu-5.15.0-76-generic
cp ~/Downloads/jammy-server-cloudimg-amd64.img ubuntu-5.15.0-76-generic.img
그런 다음 위 명령어로 이미지 초기 설정을 해주어야 한다.
#cloud-config
ssh_pwauth: true
chpasswd:
  expire: false
  users:
    - name: ubuntu
      password: '1234'
      type: text
앞서 생성한 ubuntu-5.15.0-72-generic.img 디렉토리 내부에서 위 내용으로 user-data.yaml파일을 만들어주자.
cloud-localds seed.raw user-data.yaml
qemu-img convert -f raw -O qcow2 seed.raw seed.img

# 이미지 size 조정
qemu-img resize ubuntu-5.15.0-76-generic.img +1G

# qemu 실행
qemu-system-x86_64 -enable-kvm -m 2G -nographic \
-netdev id=net00,type=user,hostfwd=tcp::2222-:22 \
-device virtio-net-pci,netdev=net00 \
-drive if=virtio,format=qcow2,file=ubuntu-5.15.0-76-generic.img \
-drive if=virtio,format=qcow2,file=seed.img
그리고 위 명령어를 통해 qemu를 실행할 수 있다.

앞서 yaml파일에서 설정하였듯이, 사용자 이름은 ubuntu, 1234이다. 입력해주면 정상적으로 로그인 된 모습이다.
qemu를 끄려면 다른 터미널을 열고 pkill qemu치면 된다.
4. 디버깅 환경 설정
sudo tar cvfz /tmp/boot.tar.gz /boot/*.15.0-76-genericqemu에서 위 명령어를 통해 /boot디렉토리의 파일을 호스트로 보내자.
scp -P 2222 ubuntu@127.0.0.1:/tmp/boot.tar.gz ./
tar xvfz boot.tar.gz
scp하고 ubuntu의 비밀번호(1234)입력해주면 파일 다운받을 수 있다. 받아서 압축 해제해주자
cd ~/kernel/ubuntu-5.15.0-76-generic

# 소스코드 다운
wget https://launchpad.net/ubuntu/+archive/primary/+sourcefiles/linux/5.15.0-76.83/linux_5.15.0.orig.tar.gz
wget https://launchpad.net/ubuntu/+archive/primary/+sourcefiles/linux/5.15.0-76.83/linux_5.15.0-76.83.diff.gz
tar xvfz linux_5.15.0.orig.tar.gz
gzip -d linux_5.15.0-76.83.diff.gz
mv linux-5.15/ linux-5.15.0-76.83
cd linux-5.15.0-76.83/
patch -p1 < ../linux_5.15.0-76.83.diff

# 디버깅 심볼 설치
cd ~/kernel/ubuntu-5.15.0-76-generic
wget -P /tmp http://ddebs.ubuntu.com/pool/main/l/linux/linux-image-unsigned-5.15.0-76-generic-dbgsym_5.15.0-76.83_amd64.ddeb
sudo apt-get install /tmp/linux-image-unsigned-5.15.0-76-generic-dbgsym_5.15.0-76.83_amd64.ddeb

# 디버깅을 위한 소스코드와 심볼 병합
cd ~/kernel/ubuntu-5.15.0-76-generic/linux-5.15.0-76.83
cp /lib/debug/boot/vmlinux-5.15.0-76-generic ./vmlinux
cp -Rf /usr/lib/debug/lib/modules/5.15.0-76-generic/kernel/* ./
5. gef설치
이때까지 gdb-peda를 썼었는데 gef가 이래저래 좋은 것 같아서 써보려고 한다.
git clone https://github.com/hugsy/gef.git ~/gef
echo "source ~/gef/gef.py" >> ~/.gdbinit
https://github.com/bata24/gef
GitHub - bata24/gef: GEF - GDB Enhanced Features for exploit devs & reversers
GEF - GDB Enhanced Features for exploit devs & reversers - GitHub - bata24/gef: GEF - GDB Enhanced Features for exploit devs & reversers
github.com
gef에 커널 전용 명령어가 들어간 버전도 있다.
여기서부터 sudo말고 아예 su root해서 진행해주면 된다.
# Run with root user (sudo is NOT recommended)
wget -q https://raw.githubusercontent.com/bata24/gef/dev/install.sh -O- | sh

cd ~/
bash -c "$(curl -fsSL https://gef.blah.cat/sh)"
git clone https://github.com/scwuaptx/Pwngdb.git
echo -e "source ~/Pwngdb/pwngdb.py\nsource ~/Pwngdb/angelheap/gdbinit.py\n\ndefine hook-run\npython\nimport angelheap\nangelheap.init_angelheap()\nend\nend" >> ~/.gdbinit
gdb -ex 'gef save' -ex quit
vim .gef.rc
그리고 vi편집기에서 아래와 같이 두 부분을 편집해주자.

layout부분을 위와 같이 수정해주고..

pd = disassemble을 추가하면 된다.
6. lx-script 빌드
cd ~/kernel/ubuntu-5.15.0-52-generic/linux-5.15.0-76.83

# gdb-script 설치
cp ../boot/config-5.15.0-76-generic .config
chmod +x ./scripts/*.sh
make olddefconfig
make scripts_gdb

# .gdbinit 설정
echo -e "set auto-load safe-path /\n" >> ~/.gdbinit
sudo bash -c 'echo -e "set auto-load safe-path /\n" >> /root/.gdbinit'
커널 디버깅 시 유용한 명령어를 사용할 수 있게 해준다.

소스코드 경로를 확인하여 .gdbinit에 반영해주자
echo -e "set substitute-path /build/linux-okuiIE/linux-5.15.0/ ./\nsource ./vmlinux-gdb.py" > .gdbinit
7. QEMU스크립트 작성
qemu를 실행할 때 마다 엄청 긴 명령어를 칠 수는 없으니 실행 스크립트를 만들어두자. ubuntu-5.15.0-72-generic 디렉토리에 다음과 같은 내용으로 run.sh를 만들어주자.
#!/usr/bin/env bash
RAM="2G"
CPU_SOCKETS="1"
CPU_CORES="2"
CPU_THREADS="2"
args=(
	# kvm 켜기, RAM 크기 설정
	-enable-kvm -m "$RAM"
	# CPU 코어 설정
	-smp "$CPU_THREADS",cores="$CPU_CORES",sockets="$CPU_SOCKETS"
	# 사용할 kernel image
	-kernel ./boot/vmlinuz-5.15.0-76-generic
	# 사용할 initial ramdisk
	-initrd ./boot/initrd.img-5.15.0-76-generic
	# kernel command line, /dev/vda1을 mount하고, 시리얼 포트를 이용해 콘솔 연결, kaslr 꺼서 디버깅 편하도록
	-append "root=/dev/vda1 console=tty1 console=ttyS0 nokaslr"
  # host의 port 2222를 guest의 port 22로 포트 포워딩
	-netdev id=net00,type=user,hostfwd=tcp::2222-:22
	-device virtio-net-pci,netdev=net00
	# 사용할 drive
	-drive if=virtio,format=qcow2,file=ubuntu-5.15.0-76-generic.img
	-drive if=virtio,format=qcow2,file=seed.img
	# vnc로 접속 가능하도록 설정
	-vnc :1
	# qemu monitor 사용 가능하도록 설정
	-monitor stdio
	# gdb에서 target remote :1234로 attach할 수 있음
	-s
)
qemu-system-x86_64 "${args[@]}" 2>&1
ssh -p 2222 ubuntu@127.0.0.1run.sh를 실행한 뒤 위와 같은 명령어로 ssh연결을 할 수 있다.
Ref.
Debugging kernel and modules via gdb — The Linux Kernel documentation
Debugging kernel and modules via gdb The kernel debugger kgdb, hypervisors like QEMU or JTAG-based hardware interfaces allow to debug the Linux kernel and its modules during runtime using gdb. Gdb comes with a powerful scripting interface for python. The k
www.kernel.org
'Hack > Kernel' 카테고리의 다른 글
| [Linux Kernel] 4. prepare & commit (1) | 2023.07.25 |
|---|---|
| [Linux Kernel] 3. KASLR (0) | 2023.07.25 |
| [Linux Kernel] 2. Kernel Debugging (0) | 2023.07.25 |
| [Linux Kernel] 1. QEMU (0) | 2023.07.25 |
| [Linux Kernel] 0. Linux Kernel Exploit🐧 (0) | 2023.07.25 |


